Transfering/exporting email folders to another user
Thanks to: https://uknowit.uwgb.edu
These instructions are to be followed when
tranferring an Outlook 2010 Inbox folder from one user to another. This
procedure uses a PST for transfer purposes only - after the transfer,
the file should be deleted. NOTE:This is NOT for storing your email on
your computer or M drive for the purpose of clearing up space on your
email profile. If you need aditional email storage, please contact the
help desk and make a request. The archiving capabilities of Outlook are
not entirely reliable so we do not advise using them.
(Scenario: Sarah wants to transfer a folder to Tom.)
Exporting (Sarah)
1. Click File --> Options.
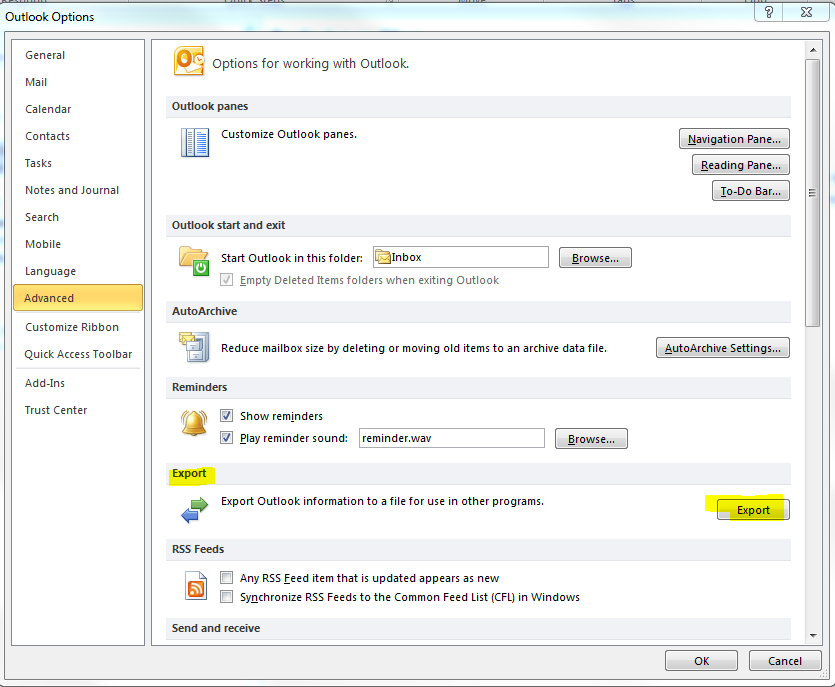
2. Click Advanced in the left pane. Under the Export section, click the Export button.
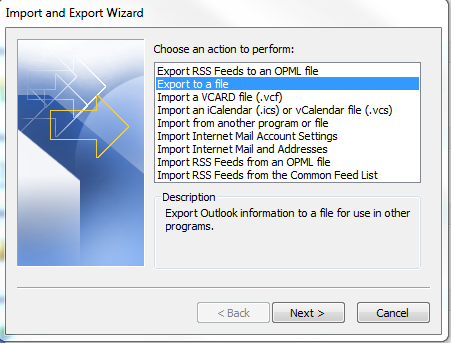
3. Select Export to a file and click Next.
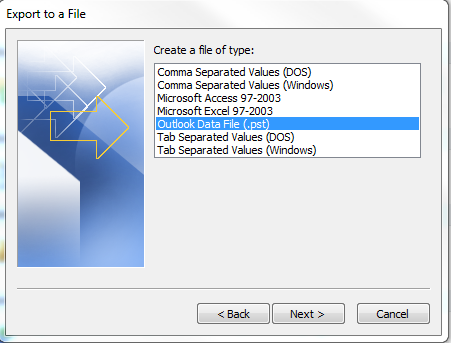
4. Select the Outlook Data File (.pst) option. Click Next
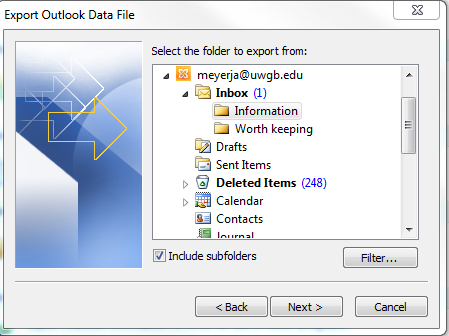
5. Select a folder you want to export. Click Next.
6. Click Browse and specify where you want to save this export file. (this will be the *.pst file that TOM will use.) You will need to be aware of where you save it for future reference. Since you will be sharing this data file with another user, it may be ideal to save it to a department network share so it can be easily accessed. You cannot email this type of file.) Type in a name for your file and click OK. Click Next.
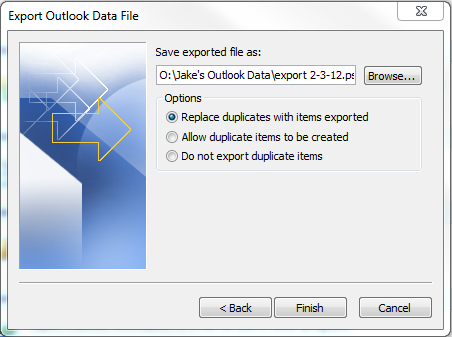
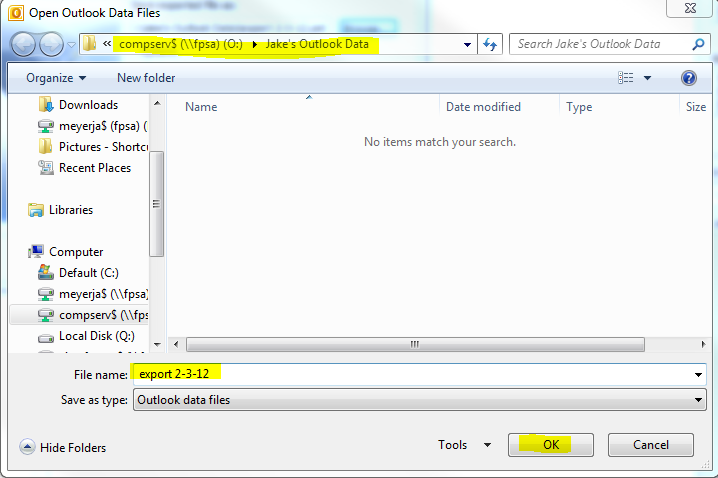
7. Optionally, you can password protect your data file. Click OK and leave the fields blank if you do not wish to password protect it. If you type in a password, click OK to continue
8. It might take several minutes for Outlook to export the folders, but once it is finished, you will be able to find the Outlook Data File wherever you saved it.

Importing (Tom)
These instructions explain how to import the Outlook Data File (pst) to another user's Inbox. NOTE: Steps above "Sarah" created this pst file.
1. Click the File menu. Select Open, then Import.

2. Select Import from another program or file and click Next.

3. Select Outlook Data File (.pst) click Next.

4. Click Browse and locate the data file you wish to import to your Outlook profile. Select the file and click Open. Click Next

5. Choose a location within your mailbox where you would like to import the data file. Be sure you select the proper mailbox (personal, department, etc...). Click Finish.

6. It may take up to a few minutes to finish the import process. Once it has completed, you will see the folder wherever you decided to import to. This location will most likely be a subfolder within your Inbox.
7. You may now delete the PST file.
Exporting (Sarah)
1. Click File --> Options.

2. Click Advanced in the left pane. Under the Export section, click the Export button.
3. Select Export to a file and click Next.

4. Select the Outlook Data File (.pst) option. Click Next

5. Select a folder you want to export. Click Next.

6. Click Browse and specify where you want to save this export file. (this will be the *.pst file that TOM will use.) You will need to be aware of where you save it for future reference. Since you will be sharing this data file with another user, it may be ideal to save it to a department network share so it can be easily accessed. You cannot email this type of file.) Type in a name for your file and click OK. Click Next.


7. Optionally, you can password protect your data file. Click OK and leave the fields blank if you do not wish to password protect it. If you type in a password, click OK to continue
8. It might take several minutes for Outlook to export the folders, but once it is finished, you will be able to find the Outlook Data File wherever you saved it.

Importing (Tom)
These instructions explain how to import the Outlook Data File (pst) to another user's Inbox. NOTE: Steps above "Sarah" created this pst file.
1. Click the File menu. Select Open, then Import.

2. Select Import from another program or file and click Next.

3. Select Outlook Data File (.pst) click Next.

4. Click Browse and locate the data file you wish to import to your Outlook profile. Select the file and click Open. Click Next

5. Choose a location within your mailbox where you would like to import the data file. Be sure you select the proper mailbox (personal, department, etc...). Click Finish.

6. It may take up to a few minutes to finish the import process. Once it has completed, you will see the folder wherever you decided to import to. This location will most likely be a subfolder within your Inbox.
7. You may now delete the PST file.


Comentarios
Publicar un comentario
Dime si la información de este blog te sirvio.