Etherchannel (Port Channel) on Cisco ASA
Thanks to: http://www.amirmontazeri.com/

Generally Cisco ASA has one Management interface and four Gigabit Interfaces, but in modern systems and scalable Infrastructures you will need more than four Interfaces. To overcome this limitation you can configure some VLANs and trunk them to an Interfaces. This was a standard solution to this problem, however since ASA version 8.4.2 you are able to use Ether Channel to solve this problem.
The benefit of Ether Channel or Port Channel is that you are able to configure redundancy and load balancing in the same time; all four ASA Interfaces will be bundle to a link in the Layer 2 then you assign all VLANs directly to the Port Channel and so they applied to all Interfaces of ASA .
The ASA distributes the traffics to all Interfaces, which means you have the functioning Load balancing, furthermore if you lost one or two Interface the whole traffics will be distribute to the Interfaces which are available.
If you run the Port Channel on the ASA then you are permitted to make up to 200 VLANs.
If you run the Port Channel on the ASA then you are permitted to make up to 200 VLANs.
The Port Channel’s configuration is not really tricky but it is a little bit complex and it will be best if you keep the history of what you have changed to not lose overview of what and why you actually configured.
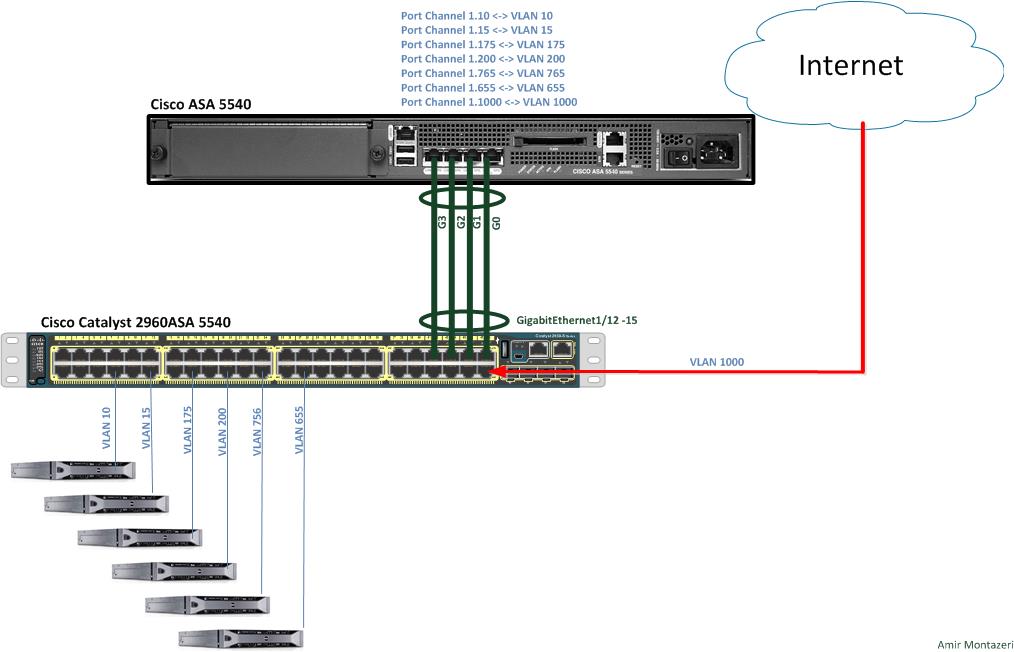
Here you can see the Port Channel configuration on an ASA 5540 and a Catalyst 2960.
OK, first of all you have the configure the Port Channel on the Catalyst; it is very simple something like that:
Here you can see the Port Channel configuration on an ASA 5540 and a Catalyst 2960.
OK, first of all you have the configure the Port Channel on the Catalyst; it is very simple something like that:
Then I apply the Port Channel configuration, to four catalysts Interfaces which are connected to the ASA (in this case GigabitEthernet1/12 till GigabitEthernet1/15 :
Ok we are finish with catalyst configuration; now let’s go to the ASA
Now we have to create the Port Channel:
Now we have to create the Port Channel:
We apply the Port Channel 1 to four Interfaces:
The next steps are very important , for each VLANs you have to create a port-channel sub-Interfaces, in there you define the VLAN ID , IP address and the security-Level , I will show you here one inside and one OUTSIDE sub-interface:
and
Well, that is all. !!
It is important to have the same VLAN’s number and VLAN’s ID of both side, there when you have a new VLAN you should apply that configuration in Catalyst first. For debugging and control the Port Channels you can use the :
The command displays the number of Port Channel group and which Interfaces are member to this ; furthermore you can see the Channel-Group Protocol LACP ( Link Aggregation Control Protocol) ;you have to consider that Cisco ASA support LACP only (no PAgP ) ; you get more useful information by using :
For the Catalyst I prefer to use the :
Just as the commands in the ASA , the catalyst will show you now the number of Port Channel , port channel status and the physical Interfaces which are applied to this Port Channel group .
Don’t worry about the Spanning-tree Protocol (STP ) on the Catalyst , the STP counts the four EtherChannel’s Interfaces as “one” link like a single port so no member of the EtherChannel will be blocked from STP to prevent looping , I personally use the portfast for each Port Channel member Interface but you have to modify the command for a trunk interface :


Comentarios
Publicar un comentario
Dime si la información de este blog te sirvio.