Cisco WCCP Squid Transparent Proxy
Thank to: https://networklessons.com
WCCP (Web Cache Communication Protocol) is a Cisco protocol that lets you redirect web traffic from clients to a proxy server. Using a proxy server has a number of advantages:
- Caching: reduces network bandwidth because web traffic that has been requested before can be retrieved from the proxy cache instead of requesting it again from the Internet.
- Filtering: all web traffic goes through the proxy server first so you can filter certain websites.
- Monitoring: If you want to know what your users are doing you can track this on the proxy server.
WCCP is used between a Cisco router and a proxy server to communicate. The proxy server will tell the router that it is “alive” and ready to serve webpages. It’s also used as a “hello” message so the router knows when the proxy is down. The router is called the WCCP server and the proxy is called the WCCP client.
In this tutorial I will first explain the basics of how WCCP forwards traffic to the proxy and then I will show you the configuration of the Cisco router and the proxy using Squid on Linux.
At the end of this post I also have wireshark captures that show you the exact traffic path from the client to a host on the Internet with the proxy in between. Let’s get started shall we?
WCCP Transparent Proxy Traffic Flows
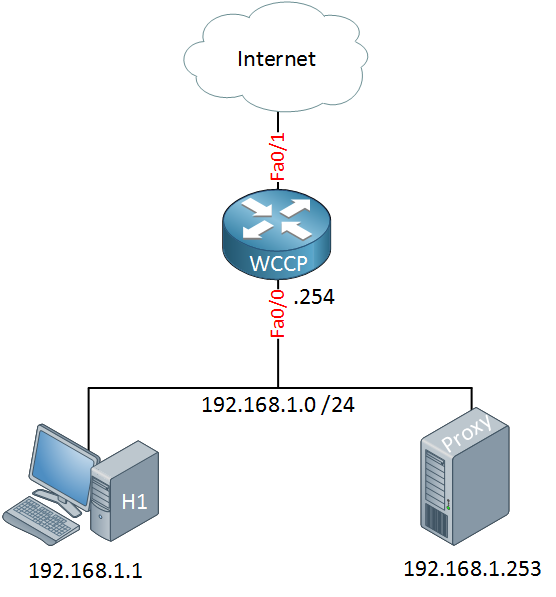
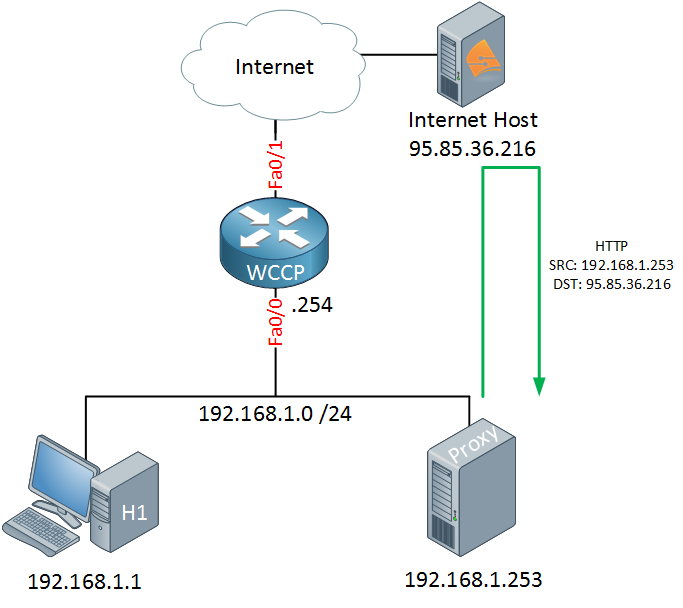
To demonstrate this I will use the following topology, a small network that has a Cisco router, a host that will browse the Internet and a Squid proxy server:
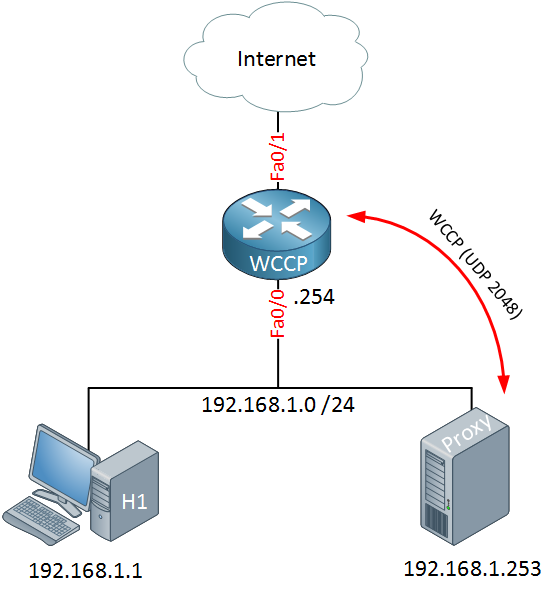
The router and proxy server are both running WCCP. The squid proxy server will announce itself to the router using UDP port 2048 and the router will respond:
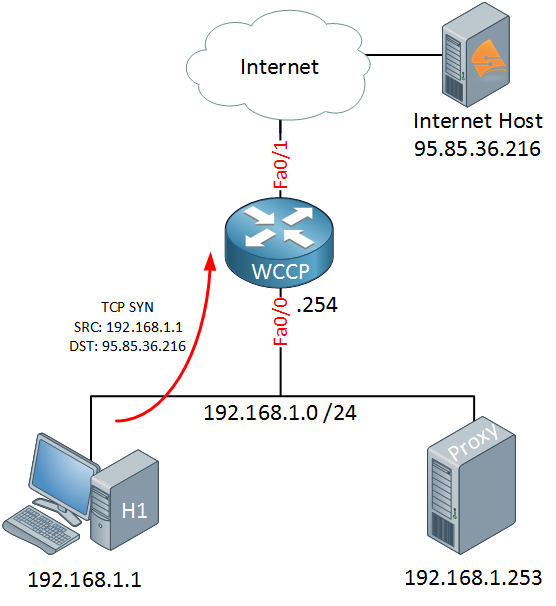
When the host wants to browse the Internet it will create a TCP SYN packet for the destination which will end up at the router:
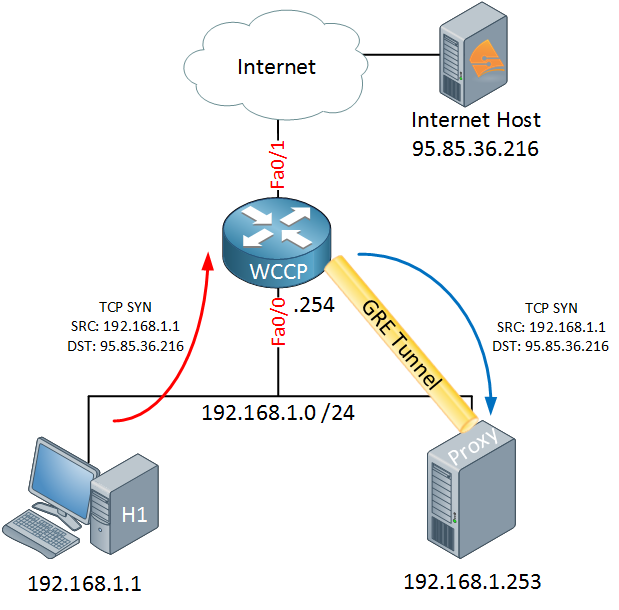
Without WCCP, the TCP SYN would be forwarded to the Internet because we are running WCCP, something else will happen. The router will forward the TCP SYN from the host to the proxy server:
To make sure that the original packet does not change it will use a GRE tunnel for this. Normally GRE is used when the proxy server is on another subnet, when the proxy server is on the same subnet you can also use layer 2 redirection. The proxy server will check its cache and see if it has served the requested webpage before:
When it doesn’t have anything in its cache, the proxy server will contact the webserver on the Internet and request the webpage that the host was looking for. Once this process is done, it can serve the webpage to the host:
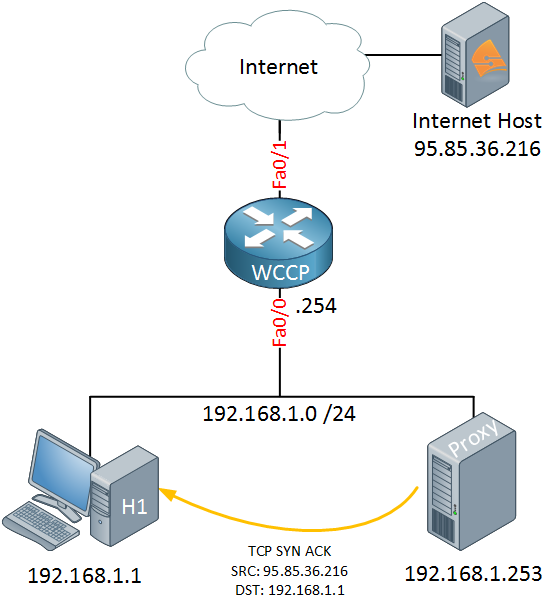
Once the proxy server has the webpage it will send a TCP SYN ACK to the host that is still waiting for the webpage. The important part here is that the source IP address of this packet is the IP address of the host on the Internet, NOT the proxy server! From the host’s perspective, it thinks that it is talking directly to the webserver and it has no idea that there is a proxy server in the network. This is what we call a transparent proxy.
You now have an idea how WCCP and proxying works, let’s look at the configuration of the proxy server and the Cisco router. I will use the topology that I just showed you for this demonstration.
Squid Proxy Configuration
Squid is a very popular proxy server that is used by a lot of ISPs. It supports HTTP, HTTPS, FTP and of course WCCP. In my example I used Linux CentOS 6.5 but the configuration on Ubuntu or any other Linux distribution is pretty much the same.
The first thing I will do is disable selinux. It’s a good thing for security but it can be a pain when you are troubleshooting:
# vim /etc/sysconfig/selinux
Change the line that says “SELINUX=enforcing” to this:
SELINUX=disabled
Just in case, reboot your server and install squid:
# yum install squid
Squid is in the default repositories so we don’t have to worry about compiling it ourselves. Just to be sure, you should check if your version supports WCCP. You can do this with the following grep command:
# squid -v | grep enable-linux-netfilter | grep enable-wccpv2
If you see some output…good! Your squid version supports WCCP, if not…use another repository or compile it yourself with these options.
Even with a default configuration, squid will work. Let’s start it and see what it does:
# service squid start
Starting squid: ....                                       [  OK  ]
After a reboot we want to make sure that squid is still running, you can use chkconfig for this:
# chkconfig squid on
You can find all log files for squid in the /var/log folder. Let’s check if squid is having any issues:
# cat /var/log/squid/squid.out
The “squid.out” logfile contains all the errors. If you didn’t configure a hostname it will spam your log with this message:
WARNING: Could not determine this machines public hostname. Please configure one or set 'visible_hostname'.
Don’t worry about this, we will fix it in a minute. This message doesn’t cause any errors but it does fill your log.
By default IPtables will only allow incoming SSH traffic. We need to make a couple of changes here:
# vim /etc/sysconfig/iptables
Squid uses TCP port 3128 by default, I want to make sure that whenever someone connects to port 80 that it will be redirected to port 3128. You can do this by adding some NAT rules:
*nat
:PREROUTING ACCEPT [0:0]
:POSTROUTING ACCEPT [0:0]
:OUTPUT ACCEPT [0:0]
-A PREROUTING -i wccp0 -p tcp -m tcp --dport 80 -j REDIRECT --to-port 3128
COMMIT
In the filter section you should add a line that allows incoming connections to TCP port 3128:
-A INPUT -m tcp -p tcp --dport 3128 -j ACCEPT
And don’t forget to add an entry that allows GRE traffic between the Cisco router and Squid:
-A INPUT -s 192.168.1.254 -d 192.168.1.253 -p gre -j ACCEPT
To make your life a bit easier, here is what my IPtables configuration looks like:
*nat
:PREROUTING ACCEPT [0:0]
:POSTROUTING ACCEPT [0:0]
:OUTPUT ACCEPT [0:0]
-A PREROUTING -i wccp0 -p tcp -m tcp --dport 80 -j REDIRECT --to-port 3128
COMMIT
*filter
:INPUT ACCEPT [0:0]
:FORWARD ACCEPT [0:0]
:OUTPUT ACCEPT [38:4348]
-A INPUT -m state --state RELATED,ESTABLISHED -j ACCEPT
-A INPUT -p icmp -j ACCEPT
-A INPUT -i lo -j ACCEPT
-A INPUT -p tcp -m state --state NEW -m tcp --dport 22 -j ACCEPT
-A INPUT -s 192.168.1.254 -d 192.168.1.253 -p gre -j ACCEPT
-A INPUT -m tcp -p tcp --dport 3128 -j ACCEPT
-A INPUT -j REJECT --reject-with icmp-host-prohibited
-A FORWARD -j REJECT --reject-with icmp-host-prohibited
COMMIT
Reboot IPtables when you are done to load the new rules:
# service iptables restart
Squid and IPtables are now ready. This is a good moment to test a few things…we can request a webpage from the proxy server to check if squid is working:
# squidclient -h 192.168.1.253 -p 3128 https://networklessons.com
HTTP/1.0 200 OK
Server: nginx/1.7.1
Date: Wed, 04 Jun 2014 10:52:19 GMT
Content-Type: text/html
Vary: Accept-Encoding
X-Powered-By: PHP/5.3.3
Last-Modified: Thu, 01 Jan 1970 00:00:00 GMT
Pragma: public
Cache-Control: max-age=3600, public
ETag: f80d592b1d8bbf43428e22e2aa567be7
Age: 18
X-Cache: HIT from localhost
X-Cache-Lookup: HIT from localhost:3128
Via: 1.0 localhost (squid/3.1.10)
Connection: close
You can use squidclient to request a webpage. We now know that we can reach a webserver on the Internet and that squid is checking its cache to see if it can serve the webpage. So far so good!
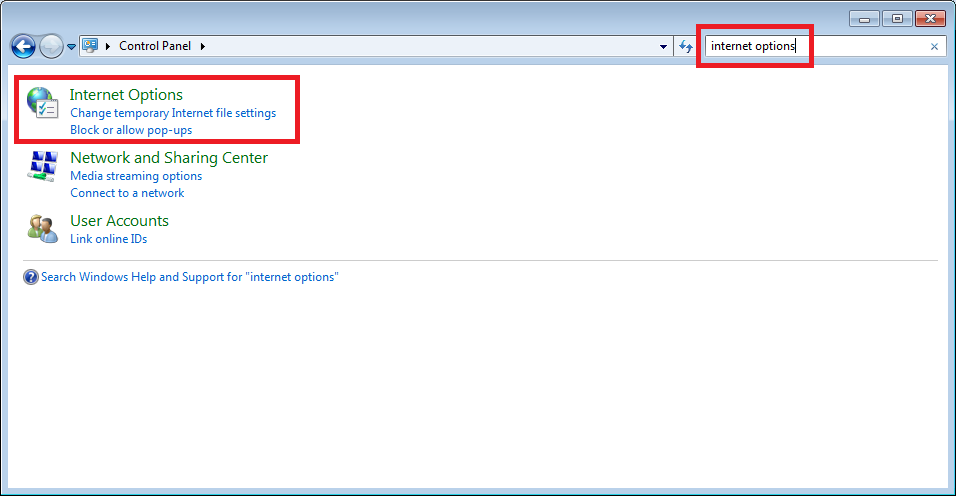
Another good method to check if squid is working is to use a host, for example a Windows 7 computer. Open up your control panel and select Internet Options:
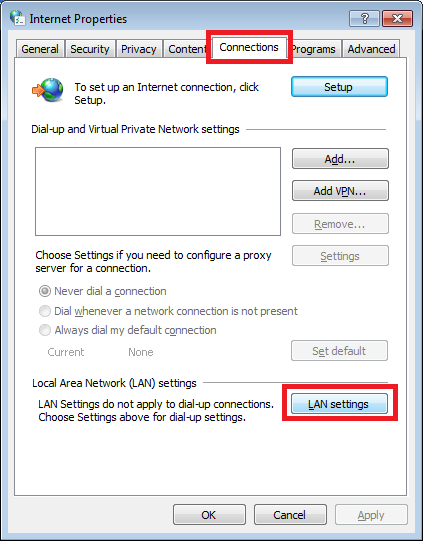
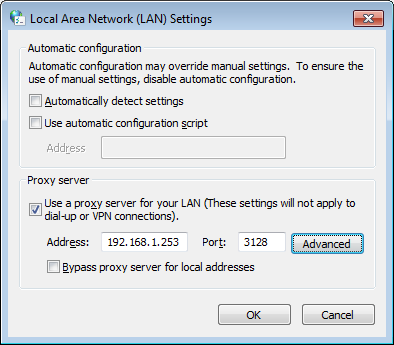
Select the “Connections” tab and hit the “LAN settings” button:
Uncheck the “Automatically detect settings” button and enter the IP address and port of the squid proxy server:
Click “OK” and open up your webbrowser, fire up some websites and check the logfile to see what is going on:
# tail /var/log/squid/access.log
You will see something like this:
1401879800.886 993 192.168.1.1 TCP_MISS/200 13273 GET https://networklessons.com/ - DIRECT/95.85.36.216 text/html
The “TCP_MISS” means that this webpage wasn’t served from the cache. Anyway we verified that squid is working with its default settings. It’s time to make some changes so it supports WCCP. Make sure to remove the proxy server settings from your computer before you continue!
The entire squid configuration is in a single file:
# vim /etc/squid/squid.conf
Look for this line:
http_port 3128
And uncomment it:
#http_port 3128
Now you need to add the following lines:
visible_hostname Squid
http_port 3128 intercept
wccp2_router 192.168.1.254
wccp2_forwarding_method gre
wccp2_return_method gre
wccp2_service standard 0
The visible_hostname line is used to give the proxy server a name, mine is called “Squid”. I did this so the error message that I showed you earlier doesn’t show up in the log anymore. We are still using TCP port 3128 but I added intercept. The remaining lines are to enable WCCP, configure the IP address of the Cisco router and to use GRE. Save your configuration and exit, we need to create the GRE interface:
# vim /etc/sysconfig/network-scripts/ifcfg-wccp0
Add the following lines:
DEVICE=wccp0
TYPE=GRE
DEVICETYPE=tunnel
ONBOOT=yes
MY_INNER_IPADDR=192.168.1.253
MY_OUTER_IPADDR=192.168.1.253
PEER_OUTER_IPADDR=192.168.1.254
I called my tunnel “wccp0” but you can pick whatever you like. It also doesn’t matter much what IP address you pick for the inner IP address since it won’t be used. I will show you what I mean once we look at the wireshark captures. Save the configuration and enable the tunnel interface:
# ifup wccp0
CentOS (and probably most Linux distributions) don’t allow IP forwarding by default so we need to enable it ourselves. Open the following file:
# vim /etc/sysctl.conf
And change the line below from 0 to 1:
net.ipv4.ip_forward = 1
And we need to add two additional lines:
net.ipv4.conf.eth0.rp_filter = 0
net.ipv4.conf.wccp0.rp_filter = 0
CentOS has enabled strict RPF (Reverse Path Forwarding) by default. We need to disable this or you will see some packet drops.
That’s all you have to configure on the squid proxy server and it’s a good moment to reboot the entire server. Let’s look at the Cisco router!
Cisco Router Configuration
Configuring WCCP is pretty straight-forward. I do have to mention that there are some slight differences between IOS 12.4 and IOS 15.x. Configuration-wise it’s the same but there are a few more show commands on IOS 15.x. In my example I used a 2811 router running IOS 15.1(4)M6.
First we will enable version 2:
WCCP(config)#ip wccp version 2
I will create two access-lists. One to define what proxy servers we allow and another one to select the hosts that we allow. Here’s the proxy server one:
WCCP(config)#ip access-list standard SQUID_SERVER
WCCP(config-std-nacl)#permit 192.168.1.253
And here´s the ACL for the proxy users. The squid proxy server is in the same subnet so i make sure not to redirect that traffic. All the other traffic from 192.168.1.0/24 heading toward TCP port 80 will be redirected:


WCCP(config)#ip access-list extended PROXY_USERS

WCCP(config)#deny tcp host 192.168.1.253 any

WCCP(config)#permit tcp 192.168.1.0 0.0.0.255 any eq 80

WCCP(config)#deny ip any any


Is it working with Active Directory authorization in Squid?
ResponderEliminarNo, please view the next article https://www.odrakir.com/blog/2009/11/19/integrating-squid-with-active-directory/
ResponderEliminar