El experimentador que no sabe lo que está buscando no comprenderá lo que encuentra. (Claude Bernard).
Exchange Server certificate changes
Obtener enlace
Facebook
X
Pinterest
Correo electrónico
Otras aplicaciones
Thank to: https://www.alitajran.com/
Exchange Server certificate changes
To prevent misuse of UNC paths by attackers, Microsoft removed the parameters that take UNC paths as inputs from the Exchange Server PowerShell cmdlets and the Exchange Admin Center. These changes will affect all cumulative update (CU) releases of Microsoft Exchange Server 2019 (CU12 and later) and Microsoft Exchange Server 2016 (CU23 and later).
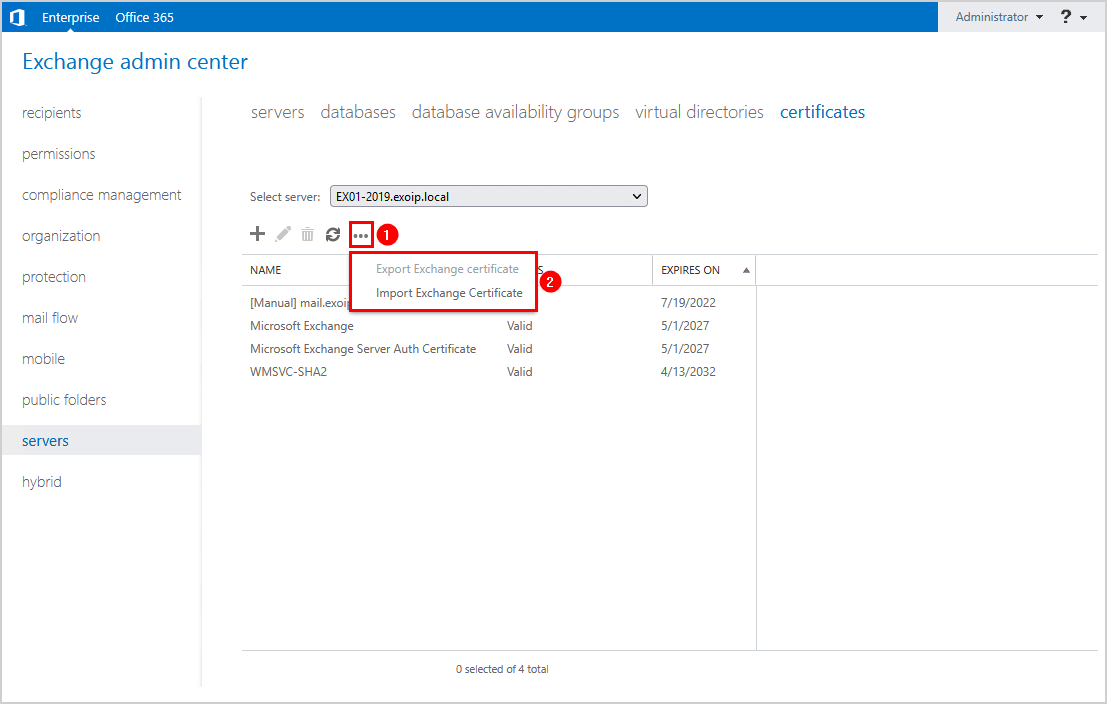
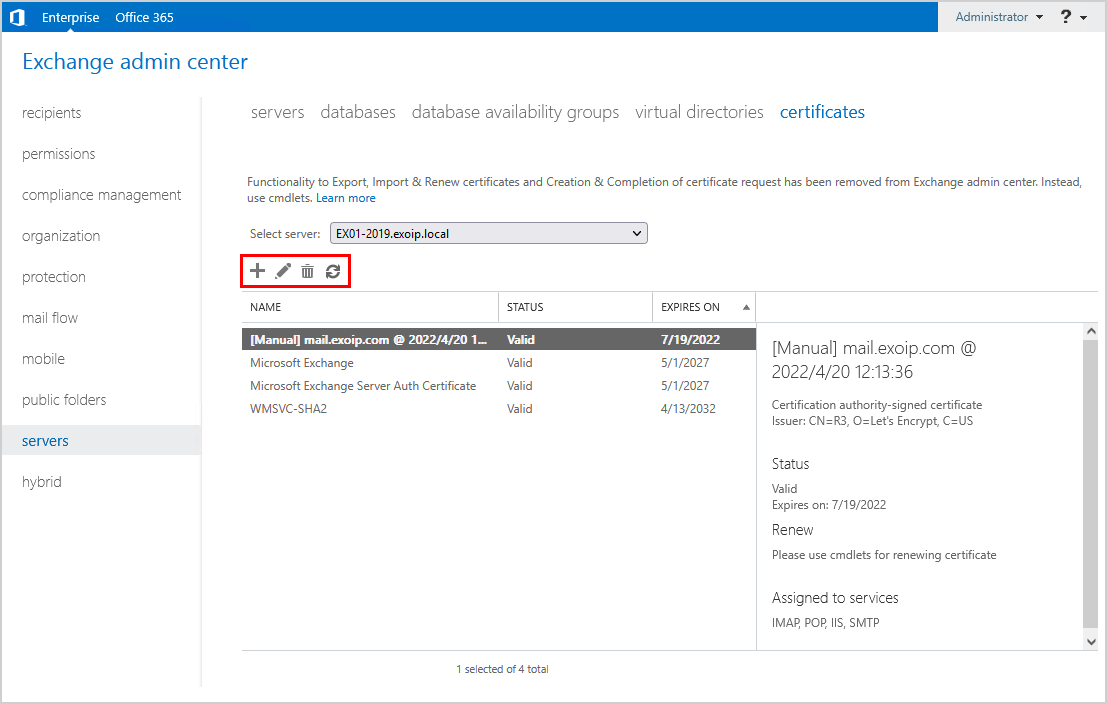
The following certificate functionality in Exchange Admin Center is removed after upgrading to Exchange Server 2019 CU12 and later and Microsoft Exchange Server 2016 CU23 and later:
Import & Export Exchange Certificate removal
Complete Exchange Certificate Request removal
New Exchange Certificate Request from CA removal
Renew Exchange Certificate Request removal
In the previous versions of Exchange Server, there was an option to import or export the Exchange certificate through Exchange Admin Center.
The option to import or export the Exchange certificate through Exchange Admin Center is removed. Instead, you must now use PowerShell cmdlets to import or export the Exchange certificate.
Exchange Server PowerShell cmdlets certificate changes
The FileName and RequestFile parameter that takes the UNC path as input is removed from Exchange Server PowerShell cmdlets after upgrading to Exchange Server 2019 CU12 and later and Microsoft Exchange Server 2016 CU23 and later.
The below articles are up to date with the certificate changes. You can follow them to create, renew, import, and export Exchange Certificates:
How to install Exchange certificate with PowerShell? You already have a certificate and you want to install it in Exchange Server. This means that you need to import the certificate in Exchange Server. After the certificate import, assign the certificate to the Exchange services. In a previous article, we showed how to import certificate in Exchange Admin Center. In this article, you will learn how to install Exchange certificate with PowerShell.
Do you have more than one Exchange Server running in the organization? You can use the same certificate for other Exchange Servers.
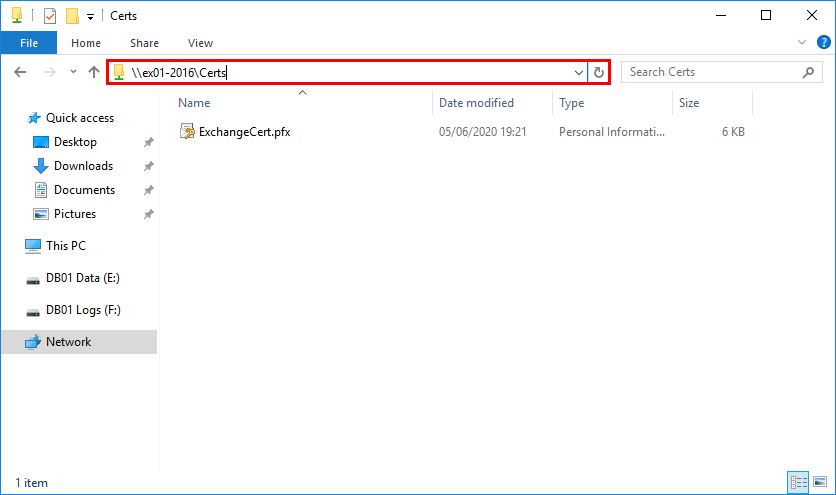
Before we start, place the Exchange certificate in a shared folder. Make sure to assign permissions to the folder. For example, the SYSTEM account. If you don’t give permission, you cannot import the certificate, and an error will show up.
Run Exchange Management Shell as administrator. Run the Import-ExchangeCertificate cmdlet, including the -FileName parameter, to install the Exchange certificate.
Note: To prevent misuse of UNC paths by attackers, Microsoft removed the parameters that take UNC paths as inputs from the Exchange Server PowerShell cmdlets and the Exchange Admin Center. These changes will affect all cumulative update (CU) releases of Microsoft Exchange Server 2019 (CU12 and later) and Microsoft Exchange Server 2016 (CU23 and later). Read more in the article Exchange Server certificate changes.
The -FileName parameter is not available since Exchange Server 2016 CU23 and Exchange Server CU12. Use the -FileData parameter to import the certificate.
The certificate is imported successfully with PowerShell.
Note: The certificate is not yet assigned to Exchange services. You can see that from the dots (…….) in the column Services.
Assign certificate to the Exchange Server services
If the certificate is not assigned to the Exchange Server services, it will do nothing. Assign the certificate with the Enable-ExchangeCertificate cmdlet and the -Services parameter. After running the cmdlet, press Y and press Enter.
[PS] C:\>Enable-ExchangeCertificate -Server "EX01-2016"-Thumbprint 0C4C00B76EB7DB236573BF79258888D32C9B753D -Services SMTP,IMAP,IIS
Confirm
Overwrite the existing default SMTP certificate?
Current certificate: '9BC8DF0DC366A87E2D397DD4CD328D91533346D2'(expires 6/6/2025 8:00:12 PM)
Replace it with certificate: '0C4C00B76EB7DB236573BF79258888D32C9B753D'(expires 9/3/2020 6:22:51 PM)[Y] Yes [A] Yes to All [N] No [L] No to All [?] Help (default is "Y"): Y
The certificate is installed in Exchange Server and everything looks great. We can see the certificate assigned to the Exchange services IMAP, IIS, and SMTP.
Did this article help you to import and assign the Exchange certificate with PowerShell?
Conclusion
You learned how to install Exchange certificate with PowerShell. First, import the certificate in Exchange Server. After that, assign the certificate to the Exchange services.
Thank to: https://fortixpert.blogspot.com/ Este artículo describe cómo configurar FortiGate para Hairpin con el uso de set match-vip y match-vip-only. En este escenario, tanto el PC como el Servidor están detrás de FortiGate y el PC quiere conectarse al Servidor apuntando a su dirección externa (92.0.2.10) en lugar de la real (10.10.10.10). Esto se llama Hairpin NAT. Solución : La solución dependerá de cómo sea el objeto IP Virtual (VIP). Solución 1 : La interfaz externa en el VIP está configurada a una interfaz particular (en este caso a wan1) #config firewall vip edit "VIP" set extip 92.0.2.10 set extintf 'wan1' set mappedip 10.10.10.10 next end Nota: En este escenario, la IP externa VIP puede ser la misma que la IP de la interfaz (es decir, 92.0.2.2) Se necesitan dos políticas: 1) Una política de entrada con ...
Thanks to: http://www.cisco.com Introduction A problem with static routes is that no inherent mechanism exists to determine if the route is up or down. The route remains in the routing table even if the next hop gateway becomes unavailable. Static routes are removed from the routing table only if the associated interface on the security appliance goes down. In order to solve this problem, a static route tracking feature is used to track the availability of a static route and, if that route fails, remove it from the routing table and replace it with a backup route. This document provides an example of how to use the static route tracking feature on the PIX 500 Series Security Appliance or the ASA 5500 Series Adaptive Security Appliance in order to enable the device to use redundant or backup Internet connections. In this example, static route tracking allows the security appliance to use an inexpensive connection to a secondary Internet service provider (ISP) in the event th...
🔧 Paso 1: Editar el archivo de configuración de Nginx Objetivo: Configurar el servidor Nginx para que rechace solicitudes HTTP que usen los métodos PUT, DELETE y TRACE, devolviendo un código de estado 405 (Method Not Allowed) . ¿Por qué hacerlo? Por razones de seguridad . Algunos métodos HTTP como PUT , DELETE y TRACE pueden representar riesgos si no son utilizados correctamente. Si tu aplicación no los necesita, es recomendable deshabilitarlos. Instrucciones: Abre el archivo de configuración de Nginx. Generalmente se encuentra en: /etc/nginx/nginx.conf O también puede estar dentro del directorio: /etc/nginx/sites-available/ dependiendo de cómo esté estructurada tu instalación. Busca la sección que tenga location / { ... } o agrégala dentro del bloque server { ... } . Dentro de ese bloque, agrega las siguientes condiciones: location / { if ($request_method = PUT) { return 405; } if ($request_method = DELETE) { return 405; } ...


Comentarios
Publicar un comentario
Dime si la información de este blog te sirvio.