Migration From Exchange 2010 to Exchange 2013 Part 2
Thanks to http://www.petenetlive.com


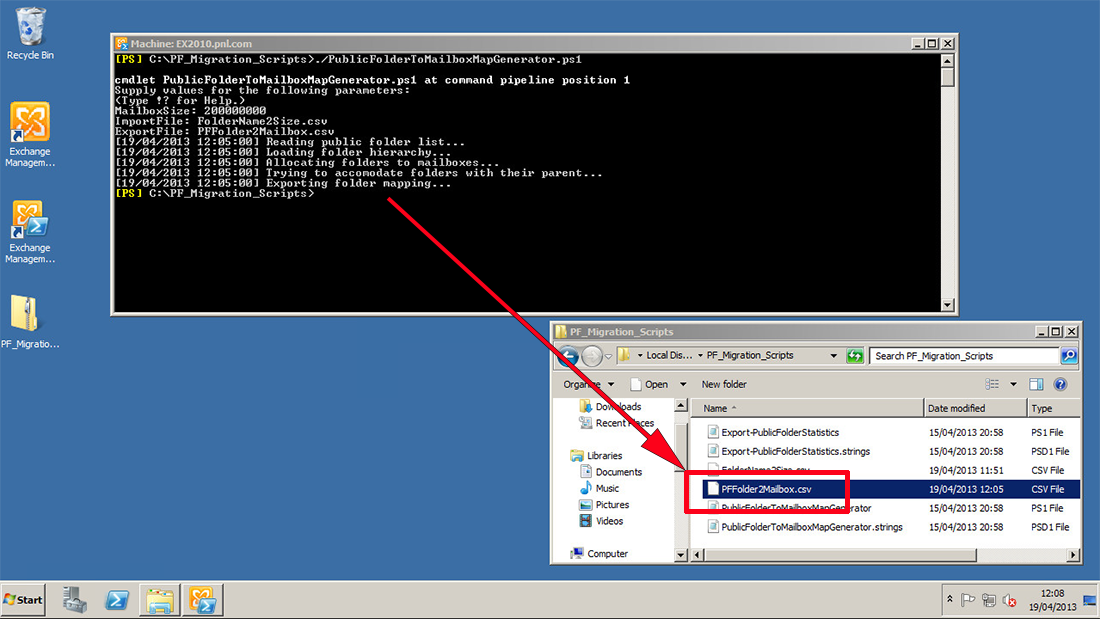
4. Create a Public Folder to Mailbox mapping file, by running thePublicFolderToMailboxMapGenerator.ps1 script, supply it with the maximum mailbox size (in bytes) Note: The Maximum size is 25GB. You will also need to supply the import file you created in step 3 (FolderName2Size.csv). Finally supply the name of the output file you wish to generate PFFolder2Mailbox.csv.

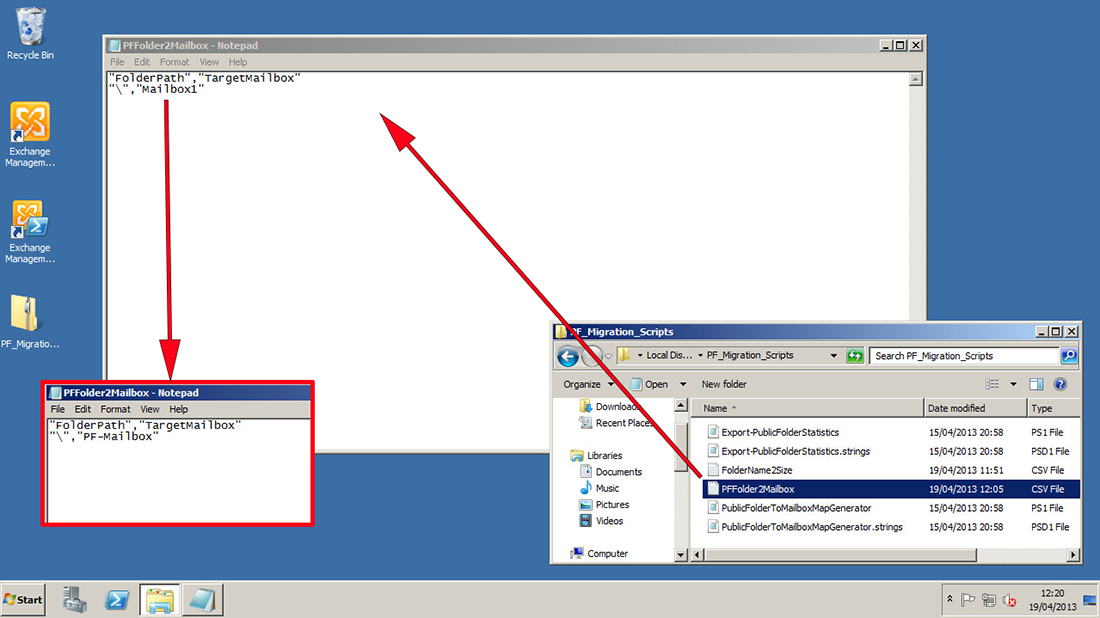
5. Open the last CSV file you created (PFFolder2Mailbox.csv) and take note of the TargetMailbox name. By default mines called Mailbox1, I'm changing it to PF-Mailbox and saving the change.Note: You may get more than one! If so take note of them all, or rename them accordingly.

6. Now go to the new Exchange 2013 Server, and create the new public folder MAILBOX. (Note: Public folders are now in a Mailbox, NOT their own Mailbox database as in previous versions of Exchange).


Migrating Public Folders from Exchange 2010 to Exchange 2013
Problem
Continued from Migration From Exchange 2010 to Exchange 2013 Part 1
Solution
Exchange 2013 Migration Step 7 "Migrate Public Folders"
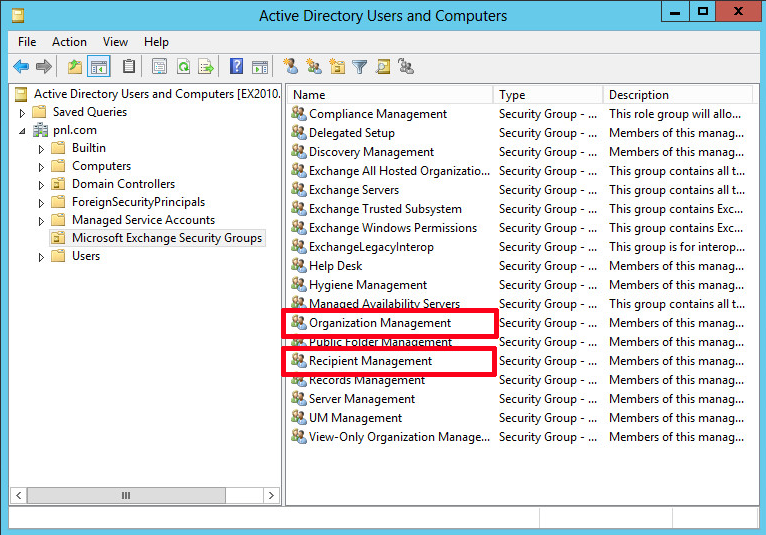
1. Make sure the user you will be performing the migration as, is in the right security groups, (Organizational Management and Recipient Management).
2. On the Legacy Exchange server download the migration scripts. Then extract them to the servers C: drive.

3. Launch the Exchange Management Shell > Change to the script directory > Then create a folder name to folder size mapping file by running the Export-PublicFolderStatistics.ps1script, supply name of the file you want to create. (here I use FolderName2Size.csv). Then supply the name of the server (the legacy one with the public folders on it).

4. Create a Public Folder to Mailbox mapping file, by running thePublicFolderToMailboxMapGenerator.ps1 script, supply it with the maximum mailbox size (in bytes) Note: The Maximum size is 25GB. You will also need to supply the import file you created in step 3 (FolderName2Size.csv). Finally supply the name of the output file you wish to generate PFFolder2Mailbox.csv.
5. Open the last CSV file you created (PFFolder2Mailbox.csv) and take note of the TargetMailbox name. By default mines called Mailbox1, I'm changing it to PF-Mailbox and saving the change.Note: You may get more than one! If so take note of them all, or rename them accordingly.
6. Now go to the new Exchange 2013 Server, and create the new public folder MAILBOX. (Note: Public folders are now in a Mailbox, NOT their own Mailbox database as in previous versions of Exchange).
New-Mailbox -PublicFolder PF-Mailbox -HoldForMigration:$true -Database Mailbox-Database-2013
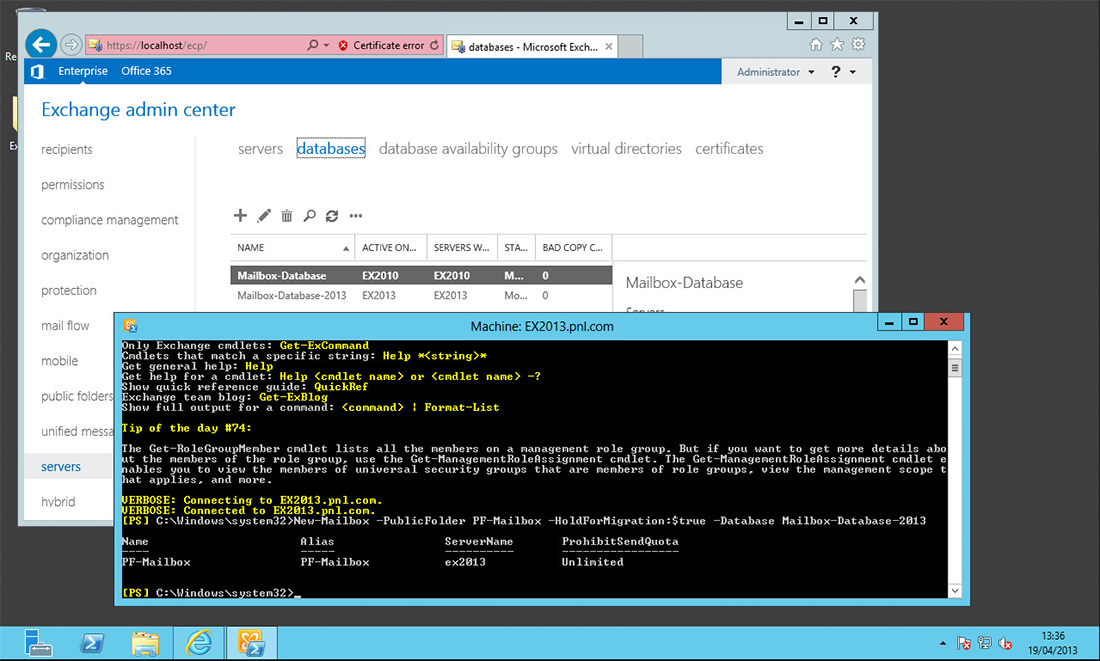
Note: Create as many as were listed in your output file above, and name them accordingly.
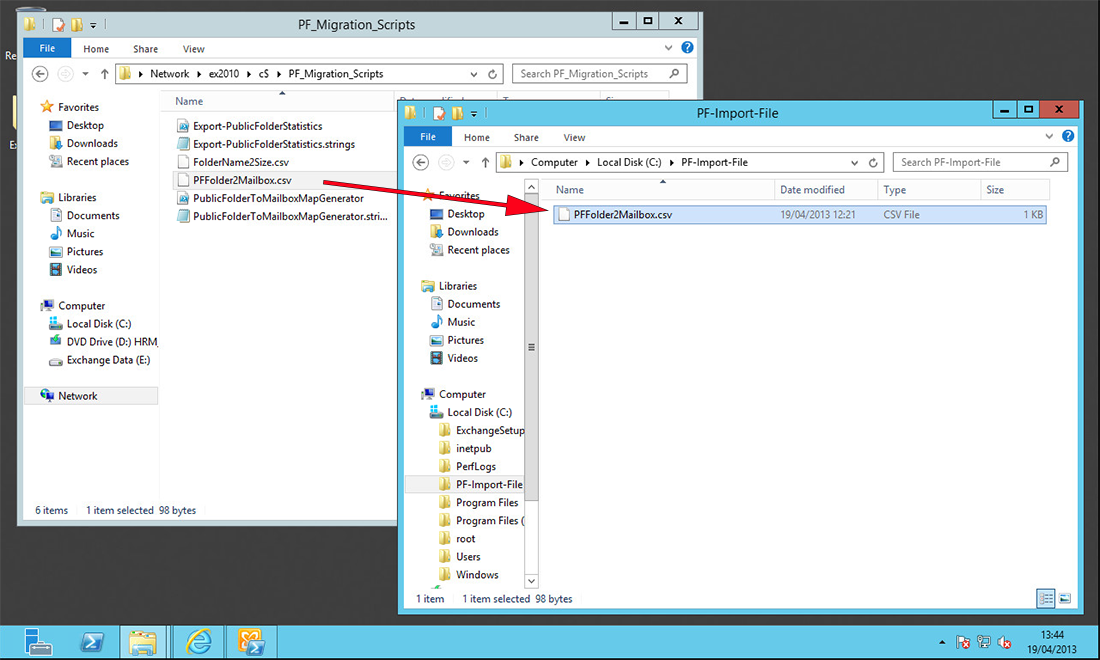
7. Copy the PFFolder2Mailbox.csv file (Generated above) from the 2010 Server to the Exchange 2013 Server, In this example I will put them in C:\PF-Import-File\
8. Create a new migration request;
New-PublicFolderMigrationRequest -SourceDatabase (Get-PublicFolderDatabase -ServerEX2010) -CSVData (Get-Content C:\PF-Import-File\PFFolder2Mailbox.csv -Encoding Byte)
Note: If you have ever done a move request, (either for a mailbox or a public folder) you may be familiar with the concept of BadItemLimit and AcceptLargeDataLoss. (If you are not it's a system of parameters you set when moving data, to allow 'Bad Items' which would cause a migration to otherwise fail), these can be a corrupt email or an email in a language format that Exchange does not understand. Thanks to Eske (Boxx Jakobsen) for the feedback asking me to include those switches.
New-PublicFolderMigrationRequest -SourceDatabase (Get-PublicFolderDatabase -ServerEX2010) -CSVData (Get-Content C:\PF-Import-File\PFFolder2Mailbox.csv -Encoding Byte) -AcceptLargeDataLoss -BadItemLimit <SwitchParameter>
<SwitchParameter> = 0 to 2147483647
<SwitchParameter> = 0 to 2147483647
If you set the BadItemLimit parameter to more than 50, you need to set the AcceptLargeDataLoss parameter to true.

9. To check progress;
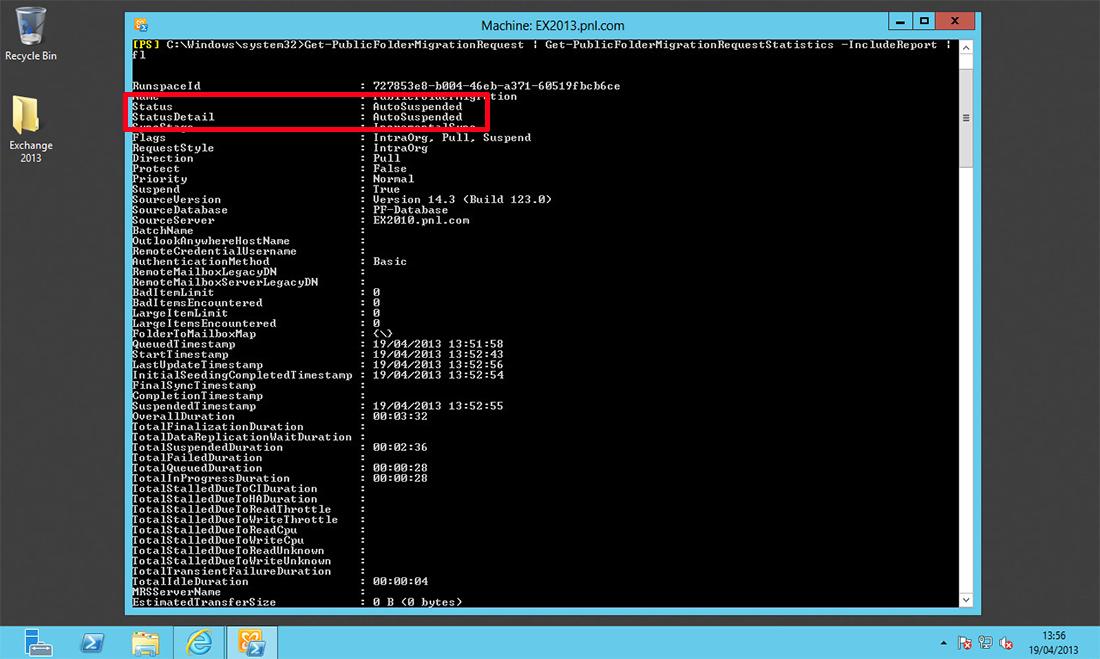
Get-PublicFolderMigrationRequest | Get-PublicFolderMigrationRequestStatistics -IncludeReport | fl
It might say Queued for quite a while, don’t worry! DO NOT PROCEED until the status says AutoSuspended;
10. If you were looking a the progress you will see its stops just before 100%, this is because you need to "Lock" the source public folder and let the migration complete. WARNINIG this will involve downtime warn your users or do this out of hours.
Set-OrganizationConfig –PublicFoldersLockedForMigration:$true

Note: I have had feedback to say this command should be ran on the Exchange 2010 Server,this TechNet article confirms.
11. Now access to the legacy Public Folder Database is shut down and replication to the newPublic Folder Mailbox is completed in the background. This can take a little time, I would wait least a couple of hours before proceeding (depending on your network topology, if you have a slow network or the Exchange2010 server is on another network segment it may take longer).
It's All Gone Wrong!
Don’t panic! You can remove the migration request with the following command;
Get-PublicFolderMigrationRequest | Remove-PublicFolderMigrationRequest
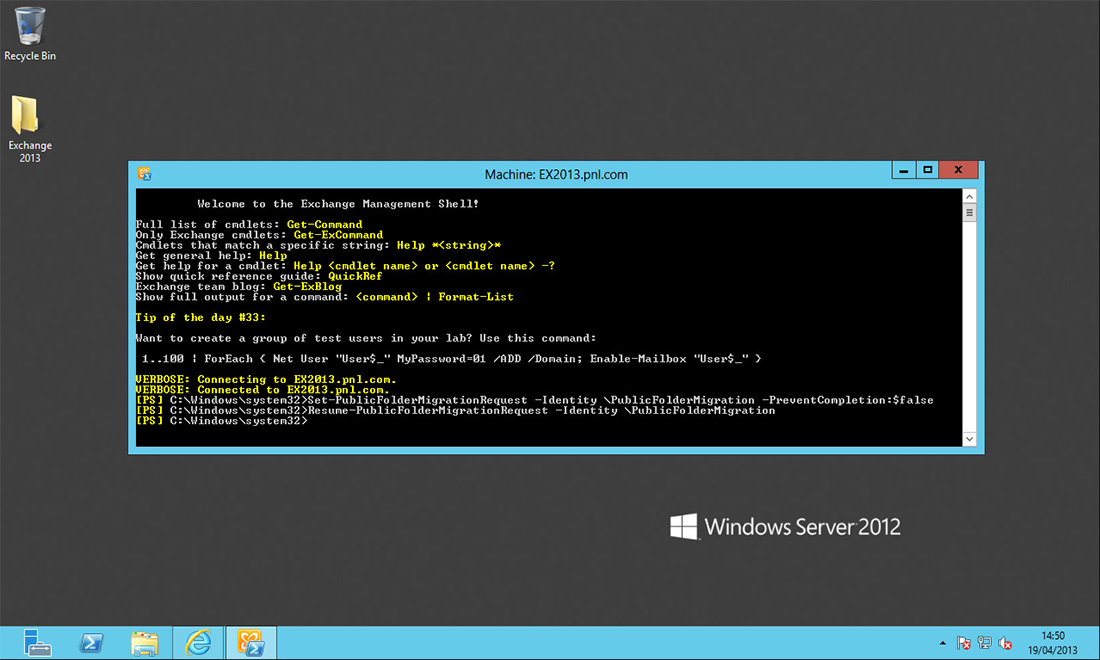
12. Complete the migration, with the following two commands;
Set-PublicFolderMigrationRequest –Identity \PublicFolderMigration -PreventCompletion:$false
Resume-PublicFolderMigrationRequest –Identity \PublicFolderMigration
Resume-PublicFolderMigrationRequest –Identity \PublicFolderMigration
13. Confirm that, the public folders are now correct and available.
Note: As per feedback (from Tobias Gebler) Test mail flow to your public folders, you may need to manually "Mail Enable" them before they function properly, In some cases you need to disable then re-enable them before they work properly.

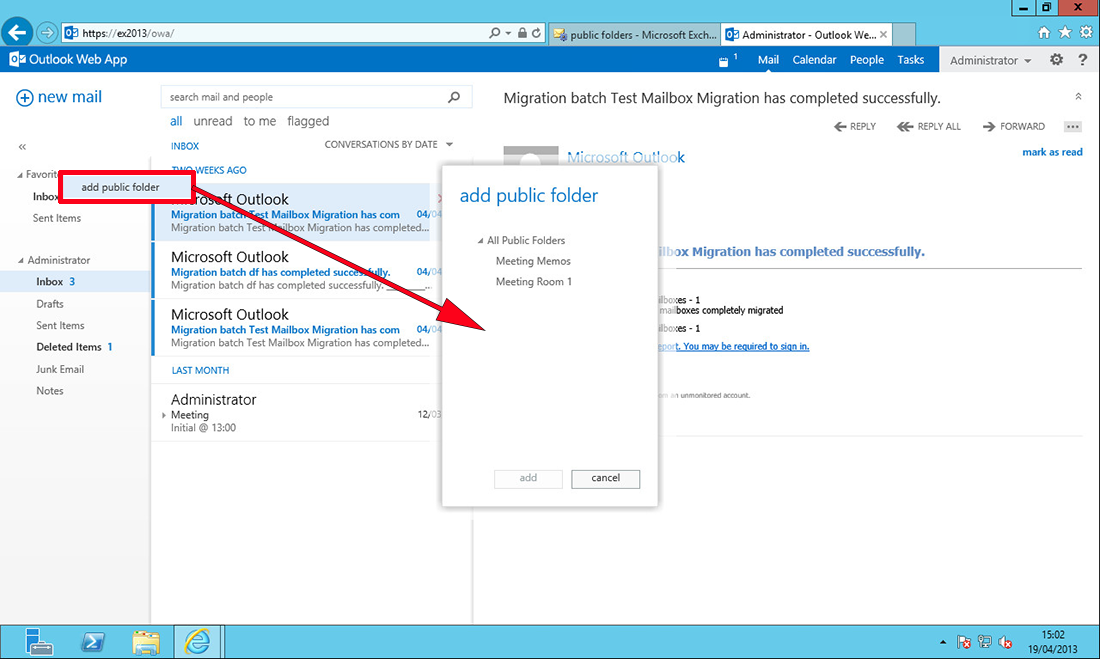
14. Remember in Outlook Web App 2013, public folders are not visible until you add them!


When seeking for a trustworthy and secure method to convert data from your organization's legacy Exchange installations to Office 365, thousands of IT administrators around the world endorse EdbMails Exchange migration tool. For Office 365 and Exchange migrations, EdbMails' Exchange migration application is revolutionary in that it takes the guesswork out of the equation. Without impacting your customers or business operations, EdbMails allows you to migrate your mailboxes from a live Exchange Server to Office 365 or between Office 365 tenants.
ResponderEliminarOne of the greatest perks of this tool is that it can do seamless migrations to Office 365 from cross-forest, cross-domain, Hosted, On-premise, and legacy Exchange without any intermediate or double migration hops.
EdbMails is an industry leading Exchange migration tool that supports all migration techniques, including cut-over, staged, and hybrid migrations. It does not necessitate the use of any advanced PowerShell scripts or commands. You can selectively choose the files or folders at a time for migration without losing any data. More information and features regarding this wonderful utility can be found at https://www.edbmails.com/pages/exchange-server-migration-tool.html.
To know more : exchange 2010 to office 365 migration