Fortigate Hair-pinning VIP - from DMZ to LAN (Internal access to DMZ with External Address)
- Obtener enlace
- X
- Correo electrónico
- Otras aplicaciones
Thanks to: https://community.fortinet.com/
Description
This article describes how to configure FortiGate for Hairpin with the use of set match-vip and match-vip-only.
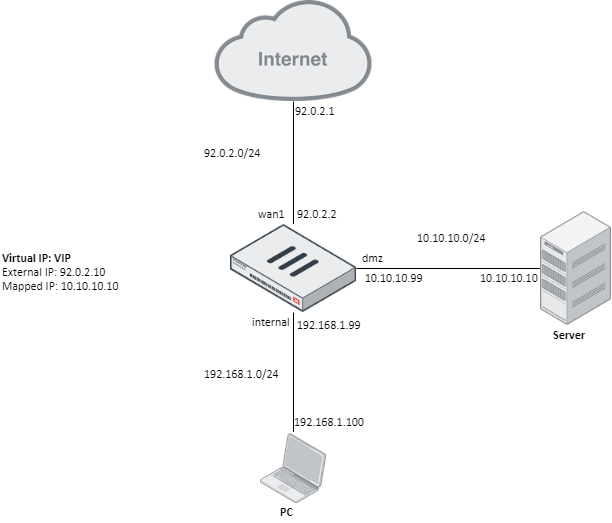
In this scenario, both PC and Server are behind FortiGate and PC wants to connect to Server by pointing to its external address (92.0.2.10) instead of its real one (10.10.10.10).
This is called Hairpin NAT.
ScopeFortigate
Solution
The solution will depend on how the Virtual IP (VIP) object.
Solution 1: External interface in the VIP is configured to particular interface (in this case to wan1)
External interface set to a particular interface, for instance wan1:#config firewall vipNote: In this scenario, the VIP external IP can be the same as interface IP (i.e 92.0.2.2)
edit "VIP"
set extip 92.0.2.10
set extintf 'wan1'
set mappedip 10.10.10.10
next
end
Two policies are needed:
1) An incoming policy with VIP object as destination address and dmz as outgoing interface (interface server is behind). This would be the typical policy needed for making a device accessible from Internet.
2) An outgoing policy having as outgoing interface the same one defined as external interface in VIP object. In this case, this would be wan1.Solution 2: External interface in the VIP object is configured to “any”#config firewall policy
edit 1
set srcintf "wan1"
set dstintf "dmz"
set srcaddr "all"
set dstaddr "VIP" <----- VIP object.
set action accept
set schedule "always"
set service "ALL"
next
edit 2
set srcintf "internal"
set dstintf "wan1" <----- Same as external interface defined in VIP.
set srcaddr "all"
set dstaddr "all"
set action accept
set schedule "always"
set service "ALL"
set nat enable
next
end#config firewall vipIn this scenario, one policy from internal network directly to DMZ is sufficient:
edit "VIP"
set extip 92.0.2.10
set extintf 'any'
set mappedip 10.10.10.10
next
end#config firewall policyAnother possibility is to create the same policy as above is possible but with 'match-vip' enabled and 'all' as destination address instead:
edit 3
set srcintf "internal"
set dstintf "dmz"
set srcaddr "all"
set dstaddr "VIP" <----- VIP object.
set action accept
set schedule "always"
set service "ALL"
next
end
Note: In FortiOS v6.4.3 and above, 'set match-vip enable' is only available within the Firewall Policy When the ACTION of the policy is set to DENY, so you cannot use this possibility.
#config firewall policyNote: For this configuration to work, another policy with the VIP as destination address must be active or Central NAT must be used.
edit 4
set srcintf "internal"
set dstintf "dmz"
set srcaddr "all"
set dstaddr "all"
set action accept
set schedule "always"
set service "ALL"
set match-vip enable
next
end
Even though packet is destined to an external address, it is never forwarded to the Internet.
This packet always remains on the inside network since FortiGate will forward and translate it between interfaces.
If both the server and the PC are hosted behind the same LAN interface, the traffic used to implement the "LAN-LAN" policy prior to 6.4.3. In FortiOS 6.4.3 and higher, the traffic would match the "WAN-LAN" policy; see the traffic flow below for additional information.
In the below-mentioned example the Source "10.150.7.22" and the destination "10.5.55.218" are hosted behind the same Interface Port5:
External IP: 10.5.55.218,
Mapped IP: "10.150.4.58",
LAN Facing Interface: Port5
WAN Facing Interface: Port2
# config firewall vip
# edit "HAIRPIN-NAT"
# set uuid 15baccae-6e03-51ec-9819-8da608ba2c39
# set extip 10.5.55.218
# set mappedip "10.150.4.58"
# set extintf "any"
# set arp-reply disable
# set portforward enable
# set extport 10443
# set mappedport 443# next
# end
# config firewall policy
# edit 13
# set name "WAN-LAN"
# set uuid 5d48ff10-6e07-51ec-d776-6809a6d67bf5
# set srcintf "port2"
# set dstintf "port5"
# set srcaddr "all"
# set dstaddr "HAIRPIN-NAT"
# set action accept
# set schedule "always"
# set service "ALL"# next
# edit 14
# set name "activate-hairpin"
# set uuid 9cf01964-6e11-51ec-c4b7-880cc8ed68ab
# set srcintf "port5"
# set dstintf "port2"
# set srcaddr "all"
# set dstaddr "10.5.55.218"
# set action accept
# set schedule "always"
# set service "ALL"
# next# end
Traffic Flow Debug Output:
# id=20085 trace_id=2031 func=print_pkt_detail line=5700 msg="vd-root:0 received a packet(proto=6, 10.150.7.22:63152->10.5.55.218:10443) from port5. flag [S], seq 1502106178, ack 0, win 64240"
id=20085 trace_id=2031 func=init_ip_session_common line=5871 msg="allocate a new session-024e5953"
id=20085 trace_id=2031 func=fw_pre_route_handler line=182 msg="VIP-10.150.4.58:443, outdev-unknown"
id=20085 trace_id=2031 func=__ip_session_run_tuple line=3492 msg="DNAT 10.5.55.218:10443->10.150.4.58:443"
id=20085 trace_id=2031 func=vf_ip_route_input_common line=2584 msg="find a route: flag=05000000 gw-10.150.4.58 via port5"
id=20085 trace_id=2031 func=fw_forward_handler line=796 msg="Allowed by Policy-13: SNAT"id=20085 trace_id=2031 func=__ip_session_run_tuple line=3478 msg="SNAT 10.150.7.22->10.150.7.218:63152"
id=20085 trace_id=2031 func=ipd_post_route_handler line=490 msg="out port5 vwl_zone_id 0, state2 0x0, quality 0.
- Obtener enlace
- X
- Correo electrónico
- Otras aplicaciones


Comentarios
Publicar un comentario
Dime si la información de este blog te sirvio.